Creating a Graphical Annotation
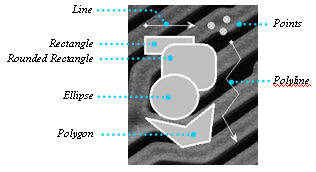
There are a number of options for annotating your images with graphical overlays. You can define points, lines, rectangles, rounded rectangles, ellipses, and polygons.
To define a graphical annotation:
Click on the Annotate group in the Select tab’s ribbon.
The Annotate toolbar is displayed.
In the toolbar, click on the annotation tool you want
to use, and draw the annotation in the image. Click
here for a description of all
available tools. Some
commonly used tools are described below.
Point
Position the crosshair cursor in the image where you want to place the point marker. Click the mouse to place the point.
Line, Rectangle, Rounded Rectangle, Circle or Ellipse
Position the crosshair cursor anywhere in the image. Click and drag the mouse from the insertion point to the desired destination.
Note: The
rectangle and rounded rectangle tools, and the circle and ellipse tools,
share the same tool space on the Annotate toolbar. Click
on the down arrow to the right of whichever tool is currently shown to
show/select the other. For
example, if the rectangle tool is currently shown, click on the down arrow
to the right of that tool to show the rounded rectangle tool.
Polygon or Polyline
These
tools allow you draw poly-vertices lines and polygons, or freehand lines
and shapes.
To draw freeform lines and shapes
Use this technique to create lines and shapes
that have smooth edges. Hold the left mouse down while you draw
with the cursor to create the desired freeform shape. Double-click
to complete the shape.
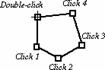
To draw polyvertices lines and polygons
Use this technique to create lines and shapes
that are made up of straight line segments. Click the left mouse
button at each vertex (including the beginning point) of the polygon.
Double-click to complete the polygon.